
You might be shocked by this, but it’s very simple.
Many people don’t know how to market their cars for a sale.
The first thing that you need and should do to every single car that you sell is, give it a nice wash, a simple interior/ exterior detail and pick up a few new items for the interior:
1.) New floor mats – if old ones can be cleaned and look like new, it’s not necessary to buy new ones.
2.) New steering wheel cover – any Wal-Mart, Target, Kmart or big store will have these items in the Auto section.
3.) Seat Covers – make sure it matches the interior color, make it blend.
4.) Nice smelling air freshener –
Febreze works well, just a few sprays before each viewing.
Not too much.
All of these Interior Spruce-ups should not cost more than $50. Prices will go up over time but try and limit your budget for this as low as possible.
I literally get my floor mats and steering wheel covers from Walmart for $6.50 each. You should buy them in bulk, this way it saves you time and money so you don’t have to go back and forth to the store for every car that you sell.
You may want to shop around for seat covers. They can be expensive. Again if the seats in the car look good, it is your choice to get them or not. I usually get them for the new smell that it adds to the car.
The smell and scent of a vehicle is very important when selling a car.
Think of it – what do most people like when they buy a new car? The new car smell, of course.
For the exterior of the car, you always want to have the rims & tires looking nice. Buy a few cans of tire foam. The tire shine stuff (any brand will do).
I use TireFoam. If the car has damage or no hubcaps, please pick some new ones up and put them on because they are so cheap and easy to pop on. $35.00 hubcaps will make the car look so different, it will amaze you.
I have literally bought many cars that just needed these things mentioned above and made an excess of $1,000 profit on these cars. Just a detail, new hubcaps with some nice car smell and a few good pictures, combined with a killer ad, will make you thousands of dollars over and over. Guaranteed!
TIP:
Make sure you have at least a half tank of gas in the car that you’re selling. People don’t want to see a car or test drive a car that is on empty. Sometimes I will fill up the car before showings.
People like to see that the car has a full tank of gas.
The small things like this are very important when making a quick sale. Always use your enthusiasm, but not too much. You need to make the buyer think in “his or her mind” that they are getting a great deal.
“The Secret Headlight Tactic”
So here is my super-secret that not many people at all know about. You can literally start up a business of this method alone and charge an easy $150.00 for 12 minutes of work.
In fact, I just recently started to see a guy advertise on
Craigslist:
“Headlight Reconditioning” Mopeds and Motorcycles – $59 Cars and Trucks – $99 Headlights and Taillights – $150.
I have been doing this for about 15 years now.
Making old, grummy headlights look like new again.
As I rewrite this manual and update it, a lot of guys are doing this as a business now, haha. You’ll even see these ‘Headlight Restoration Kits’ in stores now.
Have you seen them? But trust me, you don’t need to buy them.
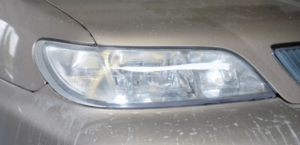
Do you see how dull and yellowish many millions of cars headlights look? I’m talking about the plastic headlights, not the old glass ones.
I’ve been secretly making these headlights look almost brand new for many years on customer cars and the cars that I sell.
It really makes an old-looking car with a dull front end look alive again while also improving the distance of your headlight brightness by 10 times.
Just look at some cars the next time you go out.
You’ll see millions of cars that suffer from these dull-looking and faded headlights.
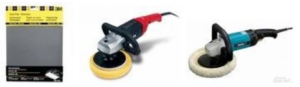
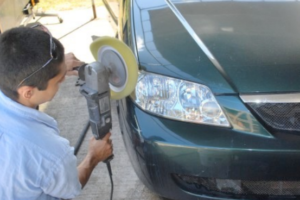
To perform this tactic, you’ll need a few tools and materials.
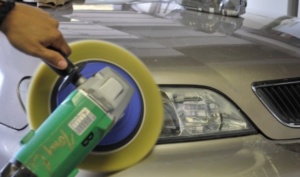
You will need a car buffer. Not the orbital,vibrating ones but the circular buffers. Here are a few pictures of different buffers you can get.
They cost about $60 for a cheap one from harborfreight.com or $200 for the good ones. The cheap ones will work. 🙂
You can easily get a used one off of Craigslist relatively cheap or maybe someone you know might let you use or borrow one.
You will need to get some rubbing compound and sandpaper. I suggest using any car buffing compound and some 1500–2000 grit wet/dry sandpaper.
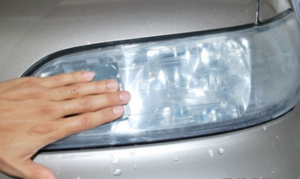
First, wet the headlights then get a piece of 2000 grit sandpaper. In fact, check out this quick video that I posted on YouTube for you:
https://www.youtube.com/watch?v=KUhnHWKy3VI
The sandpaper comes in sheets and I usually cut the sheets into four quarter pieces so that it fits in the palm of your hand. Once you have wet the sandpaper and the headlights, you want to simply sand off all of the yellow and grime off of the plastic while rinsing it with water when it starts to cloud up.
This step should only take you 2 minutes. Don’t be afraid of scratching the plastic, you’re using a fine paper that will just clean and remove old and dirty grime and plastic from the surface.
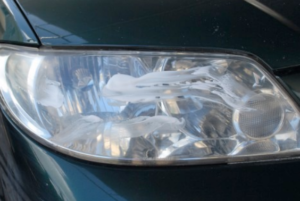
It will look dull and cloudy at this point when you are done sanding.
The compound will easily buff out the headlights, leaving a new-looking headlamp within 2 minutes of buffing it down.
Don’t worry I have complete videos for you on this in the video members area of this course.
Just sand the headlights in a circular motion. You will see the dirt, yellow and brown washing away. Make sure to keep wetting the lights with water, washing away the muck.
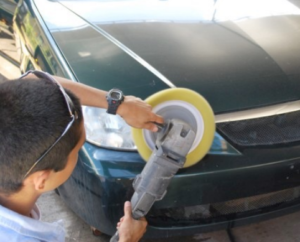
Apply a strip of the compound on the headlight and buff it out. Make sure to keep the buffer moving on the surface.
Do not stay in one place too long you will burn the plastic and melt it. 2000–2500 rpm is a good speed to use.
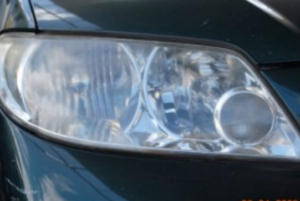
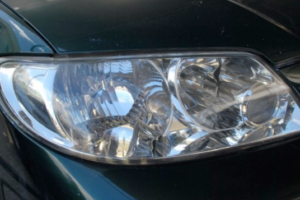
Here are more pictures of a Mazda Protege Headlight
Tactic. If you got the Video Training Course, this will all be on videos, step-by-step.
Dull Headlights
1. Wet-sand with 2000 grit sand paper.
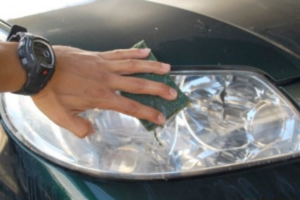
2. Wash off dirt then apply compound.
3. Buff for 2 minutes and reapply compound on dull areas to buff again.
Be careful not to buff in one section too long or you will burn the plastic headlight.
Keep the buffer moving and not staying in one section for more than 3 seconds.
I’m telling you, just doing this to the headlights of a car will make the front end look so good, it will amaze you.
Please watch the videos on this.
You’ll have a better idea of how easy it is to do.
Here’s the before and after pictures of the Mazda Headlight Tactic. Just with some sanding and buffing!